

Adobe Photoshop Tutorial No. 5 : Choco Frog
+5
f0r3v3r_force
enella
carelyn
tart_force
jkakashi01
9 posters
Page 1 of 1
![]()
 Adobe Photoshop Tutorial No. 5 : Choco Frog
![]() by jkakashi01 Fri Nov 14, 2008 1:12 am
by jkakashi01 Fri Nov 14, 2008 1:12 am
In this tutorial you can use any reptile or small animals. Here, a small frog is the subject; hes covered with chocolate as if he jumps out of the cup which is full of chocolate milk.
1. Crop the frog (or any animal). How? Click P (Pen Tool) or the button in the toolbar (see the image).
Select only the frog (or the animal that you use). If youre worrying about the shadow if youre going to crop this too or not, I suggest not selecting the shadow too, because were not moving the frog away, instead it will stay where it is. Were just making a copy of the frog and paste it in a new layer. Were doing this for easy editing without making any changes on its background. As you finish selecting the edge of the frog, you will notice a circle as you reach your starting point, which would also be the end point. Now you will see that the frog is selected. Next, right click on the middle part of the frogs image and select Make Selection. An option bar will come out of the screen. Make sure that the Anti-aliased is checked, and then click Ok.
2. Click Edit > select Copy. Go to Edit once more and then click Paste. You will notice our Layer rollout, have a new layer (Layer 1).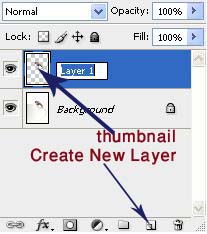
That is the layer of the copied frog. You can do anything on this layer without making any difference on the frogs shadow or even with the cup. Rename the new layer with Cropped Frog by just double-clicking on the name (Layer 1) itself, and press Enter.
3. Now, we have to colorize the frog, but before that we have to desaturate the Cropped Frog. Make sure to select the Layer of the Cropped Frog. Go to Image > Adjustments > Desaturate.
The Frog will be black and white. Click on your color picker and enter the values same with the image.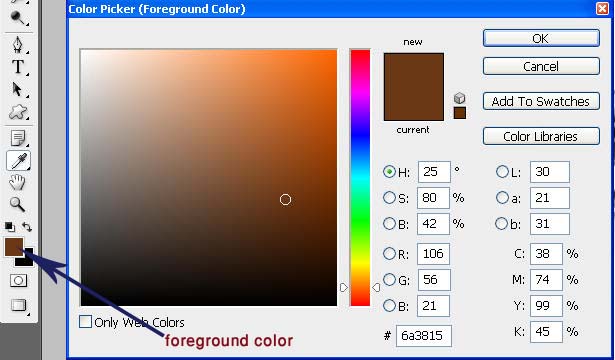
Click the Cropped Frog layer.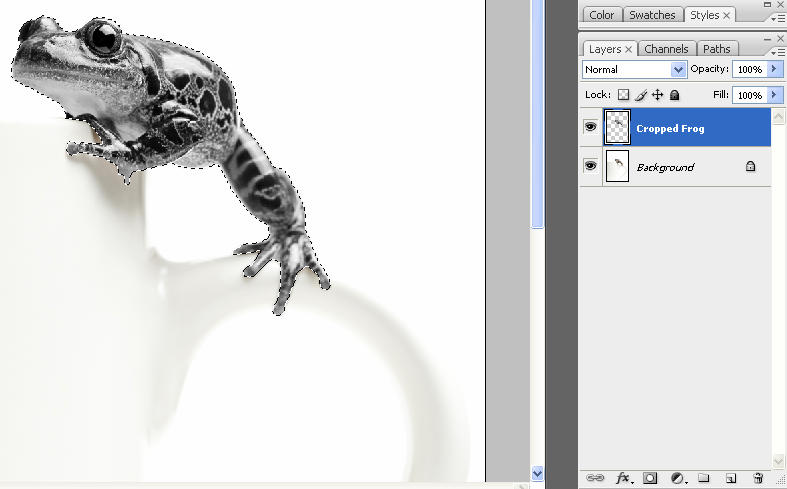
4. Hold down the Ctrl key and click on the thumbnail of the Cropped Frog layer. Create new layer and name it with Chocolate Color.
As you noticed, the frog is still selected. Go to Edit > Fill. An option box will appear. Make sure the Foreground Color is selected then click Ok.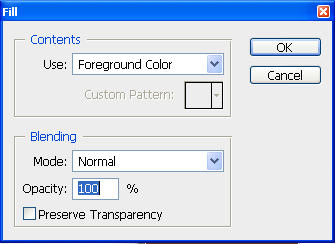
Then go to Select > Deselect.
5. Go to Blend Menu > Hard Light.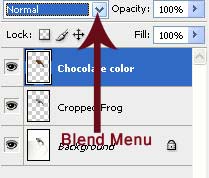

You will see now that the Chocolate color is applied in our Cropped Frog. The blend mode blends the color from the upper layer (Chocolate color) to the one below it (Cropped Frog). Right now we have to merge our two layers. All you have to do is go to Layer > Merge Down.
This will merge the upper layer down to the lower layer.
6. Now were going to smudge the Frog. Just to make its texture smoother, and gives it more realistic view of covered chocolate. All we have to do is create a new layer again and name it Smudge, because we dont have to directly affect the Cropped Frog layer. Right click on the Smudge in the toolbar and select Smudge Tool.
Right click on the image and adjust the Smudge parameters.
Turn the Hardness to zero and the Master Diameter to a lower size. In the upper toolbar make sure that the Sample All Layers is checked and the Strength is at least in the mid percent, try 45%.
Now smudge the frog to smoothen its part. How? Click Left button, hold for a while and move slowly from left to right (vice versa).
Smudge its body, legs even its feet, corner of the eyes. Make sure not to smudge the eyes and the lips. We have to retain those details for later editing. Smudge those parts that seem too sharp. After you smudged the frog you will notice that it looks smoother now.
7. Were now ready to add more details to the frog. The Drips. Make sure that the foreground color is the same chocolate color that weve made a while ago. Create a new layer and name it with Drips. Click Brush tool in the toolbar.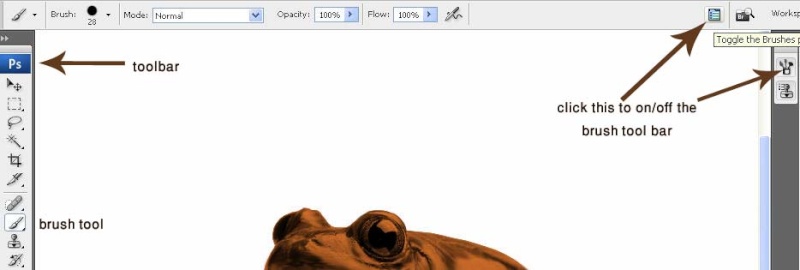
Select the Shape Dynamics and in the Control box select Fade.
In the Minimum Diameter, try adjusting the levels. The higher the Diameter the longer the fade. You can also adjust the size of your brush by right clicking. Just to make different sizes of the drips every time you make one. Now, click on the Frogs foot, hold down Shift key (to make straight line) and drag your brush down to make a drip. If ever youll notice that the drip looks softer try to adjust the Hardness of your brush to a higher value, just right click and the brush parameter will appear. The edge of the drip seems thicker and finer. Make some drips. Make sure not to give the frog a soaking wet look. Refer to the image for example. Most drips do have sort of a ball at the end part of it. To make this, just click a couple of times at the end of the drips or make a circular shape. You can also add detail at the starting point of the drip by rounding it off also.
8. Almost done. We have to add highlights to the image. Create new Layer and name it Highlights. Change the Foreground Color to white color. Adjust the Diameter of the brush to a smaller size and the Hardness to at least 45%, and at the Shape Dynamics of the brush lower down the Minimum Diameter. Now, Click at the bottom of the drip, hold down Shift key and drag up the brush tool.
Also add highlights to the frogs feet and other part of his body. You can refer to the image as an example.
9. Smudge the highlights to make it smoother and blended to the Frogs body. Create a new Layer and name it Smudge Highlights.
Click on the Smudge tool and start smudging away the highlights.
10. After smudging the highlights, were about to edit the Frogs eye, because it was covered with chocolate. All we have to do is click on the Cropped Frogs Layer and click on the Add Layer Mask. You will see this at the bottom part of the Layer rollout, its beside the fx ( Add Layer Style) icon. Click on Brush Tool. Make sure that the Opacity at the upper toolbar is set to 100% and at the Shape Dynamics of the Brush , at the Control, select OFF instead of Fade. Now zoom into the Eye and paint on that part. If nothings happening on the eye part, check your color palette. If your foreground color is white switch it to black or vice versa.
11. To give your image a more realistic view, we have to adjust its texture. Click the Smudge Layer, adjust the Opacity (youll see this at the upper potion of the Layer rollout) at least 70%. Youll notice that the original texture of the Frog comes out or appear. Lets adjust the color of the Frog. Select the Cropped Frog Layer. Hold down the Ctrl key, click on the thumbnail of the Cropped Frog Layer, press Shift key and then press the thumbnails of the Smudge Layer, Drips Layer, Highlights Layer and the Smudge Highlights Layer, and release the Ctrl and Shift keys. Youll notice that the Frog is selected. Now click the topmost layer which is the Smudge Highlights Layer. Go down and click the Create New Fill button and select Hue and Saturation.
Adjust the Saturation level down to -20%. This will give the chocolate color a flatter or matte effect. You can also add a splatter effect on the cup if you want too; just make sure it will look realistic.


1. Crop the frog (or any animal). How? Click P (Pen Tool) or the button in the toolbar (see the image).
Select only the frog (or the animal that you use). If youre worrying about the shadow if youre going to crop this too or not, I suggest not selecting the shadow too, because were not moving the frog away, instead it will stay where it is. Were just making a copy of the frog and paste it in a new layer. Were doing this for easy editing without making any changes on its background. As you finish selecting the edge of the frog, you will notice a circle as you reach your starting point, which would also be the end point. Now you will see that the frog is selected. Next, right click on the middle part of the frogs image and select Make Selection. An option bar will come out of the screen. Make sure that the Anti-aliased is checked, and then click Ok.
2. Click Edit > select Copy. Go to Edit once more and then click Paste. You will notice our Layer rollout, have a new layer (Layer 1).
That is the layer of the copied frog. You can do anything on this layer without making any difference on the frogs shadow or even with the cup. Rename the new layer with Cropped Frog by just double-clicking on the name (Layer 1) itself, and press Enter.
3. Now, we have to colorize the frog, but before that we have to desaturate the Cropped Frog. Make sure to select the Layer of the Cropped Frog. Go to Image > Adjustments > Desaturate.
The Frog will be black and white. Click on your color picker and enter the values same with the image.
Click the Cropped Frog layer.
4. Hold down the Ctrl key and click on the thumbnail of the Cropped Frog layer. Create new layer and name it with Chocolate Color.
As you noticed, the frog is still selected. Go to Edit > Fill. An option box will appear. Make sure the Foreground Color is selected then click Ok.
Then go to Select > Deselect.
5. Go to Blend Menu > Hard Light.
You will see now that the Chocolate color is applied in our Cropped Frog. The blend mode blends the color from the upper layer (Chocolate color) to the one below it (Cropped Frog). Right now we have to merge our two layers. All you have to do is go to Layer > Merge Down.
This will merge the upper layer down to the lower layer.
6. Now were going to smudge the Frog. Just to make its texture smoother, and gives it more realistic view of covered chocolate. All we have to do is create a new layer again and name it Smudge, because we dont have to directly affect the Cropped Frog layer. Right click on the Smudge in the toolbar and select Smudge Tool.
Right click on the image and adjust the Smudge parameters.
Turn the Hardness to zero and the Master Diameter to a lower size. In the upper toolbar make sure that the Sample All Layers is checked and the Strength is at least in the mid percent, try 45%.
Now smudge the frog to smoothen its part. How? Click Left button, hold for a while and move slowly from left to right (vice versa).
Smudge its body, legs even its feet, corner of the eyes. Make sure not to smudge the eyes and the lips. We have to retain those details for later editing. Smudge those parts that seem too sharp. After you smudged the frog you will notice that it looks smoother now.
7. Were now ready to add more details to the frog. The Drips. Make sure that the foreground color is the same chocolate color that weve made a while ago. Create a new layer and name it with Drips. Click Brush tool in the toolbar.
Select the Shape Dynamics and in the Control box select Fade.
In the Minimum Diameter, try adjusting the levels. The higher the Diameter the longer the fade. You can also adjust the size of your brush by right clicking. Just to make different sizes of the drips every time you make one. Now, click on the Frogs foot, hold down Shift key (to make straight line) and drag your brush down to make a drip. If ever youll notice that the drip looks softer try to adjust the Hardness of your brush to a higher value, just right click and the brush parameter will appear. The edge of the drip seems thicker and finer. Make some drips. Make sure not to give the frog a soaking wet look. Refer to the image for example. Most drips do have sort of a ball at the end part of it. To make this, just click a couple of times at the end of the drips or make a circular shape. You can also add detail at the starting point of the drip by rounding it off also.
8. Almost done. We have to add highlights to the image. Create new Layer and name it Highlights. Change the Foreground Color to white color. Adjust the Diameter of the brush to a smaller size and the Hardness to at least 45%, and at the Shape Dynamics of the brush lower down the Minimum Diameter. Now, Click at the bottom of the drip, hold down Shift key and drag up the brush tool.
Also add highlights to the frogs feet and other part of his body. You can refer to the image as an example.
9. Smudge the highlights to make it smoother and blended to the Frogs body. Create a new Layer and name it Smudge Highlights.
Click on the Smudge tool and start smudging away the highlights.
10. After smudging the highlights, were about to edit the Frogs eye, because it was covered with chocolate. All we have to do is click on the Cropped Frogs Layer and click on the Add Layer Mask. You will see this at the bottom part of the Layer rollout, its beside the fx ( Add Layer Style) icon. Click on Brush Tool. Make sure that the Opacity at the upper toolbar is set to 100% and at the Shape Dynamics of the Brush , at the Control, select OFF instead of Fade. Now zoom into the Eye and paint on that part. If nothings happening on the eye part, check your color palette. If your foreground color is white switch it to black or vice versa.
11. To give your image a more realistic view, we have to adjust its texture. Click the Smudge Layer, adjust the Opacity (youll see this at the upper potion of the Layer rollout) at least 70%. Youll notice that the original texture of the Frog comes out or appear. Lets adjust the color of the Frog. Select the Cropped Frog Layer. Hold down the Ctrl key, click on the thumbnail of the Cropped Frog Layer, press Shift key and then press the thumbnails of the Smudge Layer, Drips Layer, Highlights Layer and the Smudge Highlights Layer, and release the Ctrl and Shift keys. Youll notice that the Frog is selected. Now click the topmost layer which is the Smudge Highlights Layer. Go down and click the Create New Fill button and select Hue and Saturation.
Adjust the Saturation level down to -20%. This will give the chocolate color a flatter or matte effect. You can also add a splatter effect on the cup if you want too; just make sure it will look realistic.

jkakashi01- Tech Moderator

- Mig33 ID : red.hot_force k_a_k_a_s_h_i.01
Location : Philippines
Mood :
Character sheet
Skill: Chatter
![]()
![]()
Re: Adobe Photoshop Tutorial No. 5 : Choco Frog
![]() by tart_force Fri Nov 14, 2008 1:40 am
by tart_force Fri Nov 14, 2008 1:40 am
your really amazing bro red! keep on posting! GODbless!

tart_force- Mega member VIP

- Mig33 ID : peter.gabriel
Location : riyadh
Character sheet
Skill: Chatter
![]()
![]()
Re: Adobe Photoshop Tutorial No. 5 : Choco Frog
![]() by jkakashi01 Fri Nov 14, 2008 2:27 am
by jkakashi01 Fri Nov 14, 2008 2:27 am
you can try the frog sample...here's the picture:
CLICK HERE
CLICK HERE
jkakashi01- Tech Moderator
- Mig33 ID : red.hot_force k_a_k_a_s_h_i.01
Location : Philippines
Mood :
Character sheet
Skill: Chatter
![]()
![]()
Re: Adobe Photoshop Tutorial No. 5 : Choco Frog
![]() by carelyn Fri Nov 14, 2008 3:32 am
by carelyn Fri Nov 14, 2008 3:32 am
w0w  parang ang dali pagtiningnan pero ang hirap gawin
  TH artist ako pero hanggang imagination lang kaya ko
  ...anyway, thanks bro. kaka for sharing this to us...
...anyway, thanks bro. kaka for sharing this to us...
carelyn- Site Administrator

- Mig33 ID : care-t0-inspire, inspire_force
Location : Israel
Mood :
Character sheet
Skill: Chatter -

![]()
![]()
Re: Adobe Photoshop Tutorial No. 5 : Choco Frog
![]() by enella Fri Nov 14, 2008 6:42 pm
by enella Fri Nov 14, 2008 6:42 pm
huh,hirap bro hehehe...  ang galing!tnx for sharing...
ang galing!tnx for sharing...
enella- Hyper member lll

- Mig33 ID : sweet._.elle_force,grayson_monique
Location : Al Baha KSA
Mood :
Character sheet
Skill: Chatter
![]()
![]()
Re: Adobe Photoshop Tutorial No. 5 : Choco Frog
![]() by f0r3v3r_force Tue Nov 18, 2008 1:52 am
by f0r3v3r_force Tue Nov 18, 2008 1:52 am
wew...batch br0..amazing one haaaak..thanks for sharing br0..God bless..

f0r3v3r_force- Master Initiator

- Mig33 ID : f0r3v3r_force,j0hn_myqael, you
Location : riyadh,saudi arabia
Mood :
Character sheet
Skill: Chatter
![]()
![]()
Re: Adobe Photoshop Tutorial No. 5 : Choco Frog
![]() by cutest_dmd_force Tue Feb 10, 2009 6:51 am
by cutest_dmd_force Tue Feb 10, 2009 6:51 am
jkakashi01 wrote:you can try the frog sample...here's the picture:
CLICK HERE
best, thanks for sharing

tawagan na lang kita pag may ipapagawa ako xeo sa photoshop
 kc di ko ma gets
i appreciate your skill best
panalo ka!!!!! kelan kba babalik sa forum
 sana may internet connection ka uli sa office nyo
cutest_dmd_force- Moderator

- Mig33 ID : flower_of_may, cutest_dmd_force
Location : riyadh
Mood :
Character sheet
Skill: Chatter
![]()
![]()
Re: Adobe Photoshop Tutorial No. 5 : Choco Frog
![]() by jkakashi01 Thu Feb 19, 2009 2:38 am
by jkakashi01 Thu Feb 19, 2009 2:38 am
xenxa..i'll try to visit the forum as soon as i have my connection's back.and i'll post more tutorials.
jkakashi01- Tech Moderator
- Mig33 ID : red.hot_force k_a_k_a_s_h_i.01
Location : Philippines
Mood :
Character sheet
Skill: Chatter
![]()
![]()


coychester- Hyper member l
- Mig33 ID : coychester / wizard_force
Location : Kingdom of Saudi Arabia
Mood :
![]()
![]()
Re: Adobe Photoshop Tutorial No. 5 : Choco Frog
![]() by gone_the_force Mon Mar 09, 2009 3:29 am
by gone_the_force Mon Mar 09, 2009 3:29 am
nice bro jaka..

gone_the_force- Mega member VIP
- Mig33 ID : emzlou09,pretty_girl09
Location : canada
Mood :
Character sheet
Skill: Chatter
![]()
![]()
Re: Adobe Photoshop Tutorial No. 5 : Choco Frog
![]() by pegasus202 Sun Mar 22, 2009 11:40 am
by pegasus202 Sun Mar 22, 2009 11:40 am
tnx for sharing bro jaka...
its good to learn how to do it...
nice one bro...
its good to learn how to do it...
nice one bro...

pegasus202- VIP Member

- Mig33 ID : prince.william_force, pegasus202 p-e-g-a-s-u-s-2-0-2
Location : canada
Mood :
Character sheet
Skill: Chatter
![]()
![]()
![]()
» Adobe Photoshop Tutorial No.1
» Adobe Photoshop Tutorial No.2 : Crack Effect
» Adobe Photoshop Tutorial No. 4 : Old Picture Effect
» Adobe Photoshop Tutorial No.3 : Comic / Newspaper Effect
» Adobe Photoshop Tutorial No.8 "How To Wrap Text Around An Object?"
» Adobe Photoshop Tutorial No.2 : Crack Effect
» Adobe Photoshop Tutorial No. 4 : Old Picture Effect
» Adobe Photoshop Tutorial No.3 : Comic / Newspaper Effect
» Adobe Photoshop Tutorial No.8 "How To Wrap Text Around An Object?"
Page 1 of 1
Permissions in this forum:
You cannot reply to topics in this forum